MAKING AN EMPIRE GOWN


Source: Janet Arnold, Patterns of Fashion I, Englishwomen 's Dresses and Their Construction, C 1660-1860
I was inspired to create an Empire gown thanks to Hillary Derby, a wonderful costume designed during the 1984 season at the grand Theatre at Monmouth, who introduced me to Janet Arnold's books. Creating the gown was challenging, to say the least, especially when the pattern was a line drawing on graph paper, where each square equaled an inch.
The gown took me three tried to make as, for some reason, I didn't pay proper attention to the fact the the gown was circa 1798 - 1805 and I was not.
Needless to say, the first gown did not fit me, and nor did the second. By the third time, I learned the importance of sizing up patterns so that the garment actually fits me and not some unknown person.......
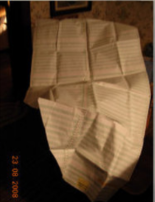
The Pattern


The patterns for the skirt back, bodice, and the side and front skirt.
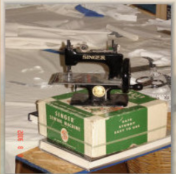
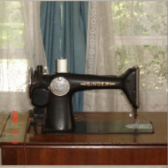
The Tools


A sewing table and a dress form named Rosie Marie by my girls.
The machines: a Singer Sew Handy (circa 1950) and an electric Singer 201-2 (circa 1945).

Fabric Choices
Part of making the gown was experimenting with fabric choices. The first choices I made for the bodice piece were not successful. I was trying to match the pattern that was picture in Janet Arnold's book:

The description of the pattern reads: "A detail of the deep purple geometric pattern on the white morning dress...." Though the fabrics I had chosen were pretty, my attempt to disguise the off-white of the fabric by edging it with blue backfired. The fact that I misread the pattern and made the edging an inch wide did not help either. I managed to create something that resembled the black bars one sees on COPS when someone has forgotten his or her clothing. Dramatic? Yes. Period? Well....


The final choice for the bodice piece: an ivory jacquard floral pattern on a white ground (the buttons are covered with the same fabric).

A mock-up of the all-important back seams.

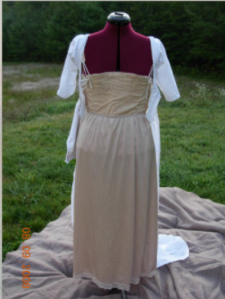
Finished bodice with built-in stays.

The interior of finished back with seams.

Finished bodice back.

Finished back with attached skirt.

Progress

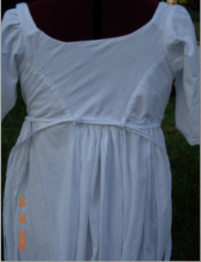
The Finished Gown


Putting on an Empire gown is a process, not just because of the gown itself is eight feet long, including the train, and requires pins and ties to make everything secure. What goes on beneath the gown, and in what order, is as important as the gown itself....


Putting on an Empire Gown
STEP ONE: The Chemise
In lieu of a chemise, is used a slip that is altered by the removal of the elastic along the top. An actual chemise is on the ever-expanding to-do list.
STEP TWO: The Stays
The choice of beige fabric for the stays was chosen for two reasons: in the information that accompanied the pattern from the Mantua-Maker, Deb Salisbury, described a set of French stays of the same color; and secondly, due to the almost diaphanous nature of the bleached muslin, the stays needed to virtually disappear beneath the gown.
STEP THREE: The Petticoat
In lieu of a petticoat, a full-length slip is employed (a petticoat is on the aforementioned to-do list) to obscure the outline of the stay's bottom.
STEP FOUR: The Gown
The gown goes on rather like a rather long shirt. The skirt and the stays hang open.
STEP FIVE: Drawing up the Ties
The tie attached to the left of the skirt passes around to the back of the gown.
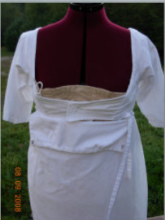
STEP SIX: Pinning the Built-in Stays
Pinning the built-in stays is next. This gives the gown its shape (as well as provide support, should one wish to go without stays).
STEP SEVEN: Passing the Ties through the Belt Loops
The ties, one attached to the left side of the skirt and the other attached to the right of the bodice piece, pass through the belt loops at the back of the gown.
STEP EIGHT: Drawing the Ties Tighter
Pulling on the ties wraps the front skirt around to the side and begins to complete still further the shape of the gown.
STEP NINE: Drawing the Ties Even Tighter
Pulling on the ties wraps the front skirt around to the side and begins to complete still further the shape of the gown.
STEP TEN: Pinning the Bodice Piece
The last step is pinning up the bodice piece so that it covers the ties and the built-in stays. Putting on the Empire gown is complete.